Package Managers and Virtual Environments Explained, Step by Step
In this post, we will cover what package managers and virtual environments are, why you should use them and how you can do so. If you have heard of tools such as pip, virtualenv, venv,conda, or maybe even used them before, but you did not fully understand what was going on under the hood, this post is for you.
Share on:

Background image by Ciprian Boiciuc (link)
Package Managers
Let’s first tackle the topic of package managers. Python is a very versatile language, which can be used for different purposes (Machine Learning, Web Development, …). When you install Python on your local machine, imagine that your computer creates a separate space for your Python installation, sort of like a “box”, where all of your personal “Python-belongings” go to. You can put more than just the default Python installation inside that box. If you have installed packages for Python before, you have likely come across the term “pip” as in pip install numpy for example. “pip” is a so-called package manager, a piece of software that manages external packages on-top of your existing Python installation. So when you run pip install numpy, pip will download and place the NumPy-package inside your Python-box. Your imaginary box now looks like this:
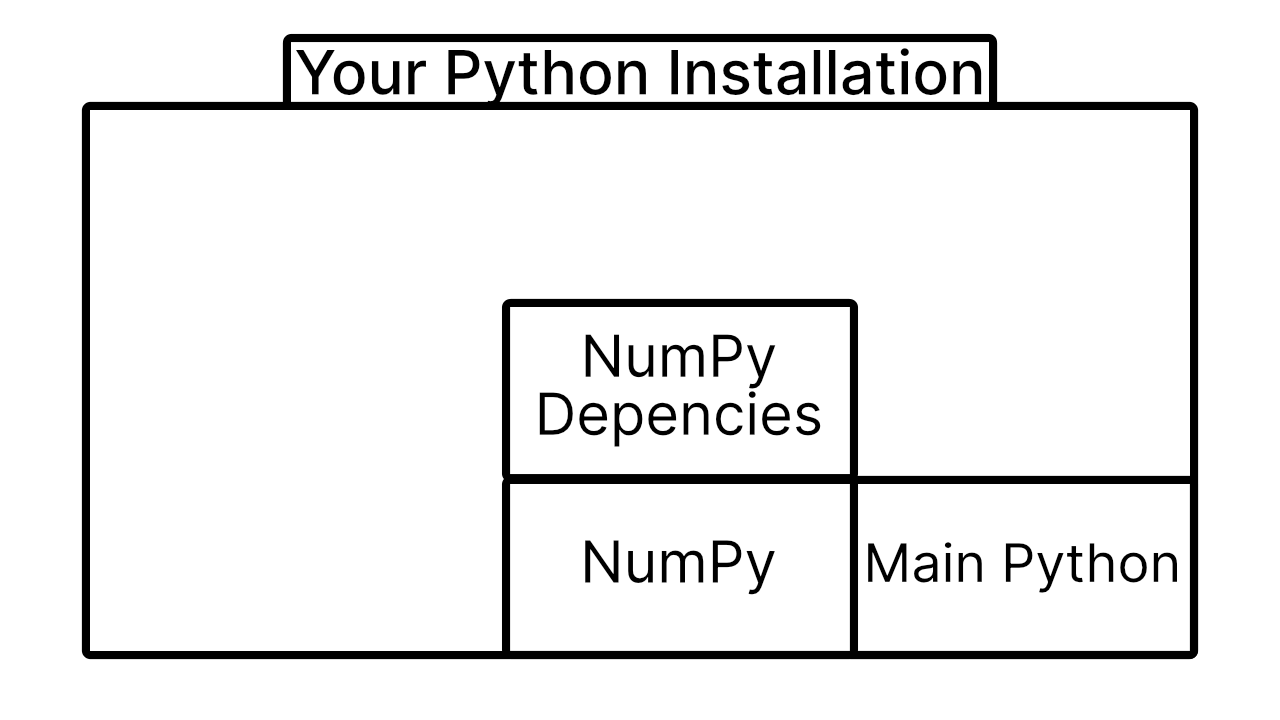
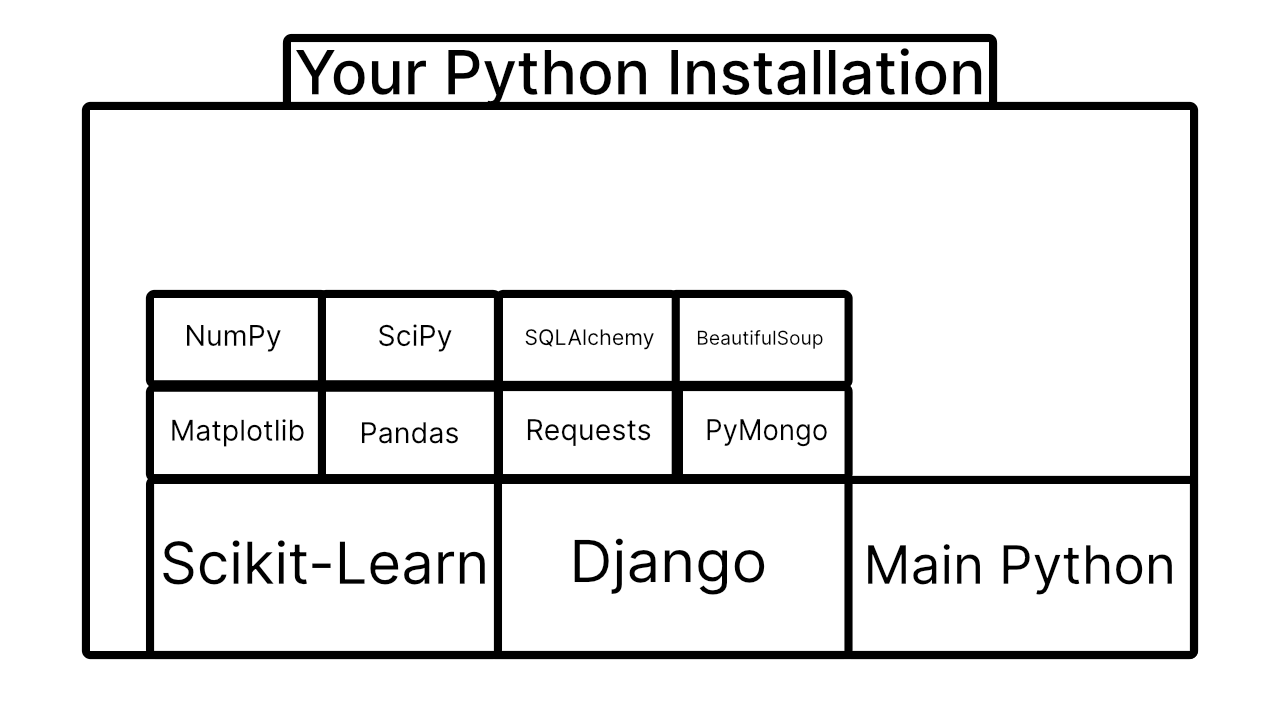
This imaginary box is often called an “environment” in practice. If you open a terminal and type python, which will open up your Python interpreter, you will be able to access all packages that are inside this box. Even if you have 10000 packages inside this box, you will be able to use them all. Now, at first this might seem like a good idea. Obviously, if you work with multiple libraries or packages, you will want to use them all whenever you want to. There is just one small catch. Imagine you are working on multiple personal projects (you don’t have to work on them simultaneously). One project is centered around Web Development and you are using Django for this one. Another project lies in the realm of machine learning and you decided to give Scikit-Learn a try. So now your environment looks like this (I will leave out the dependencies of those packages to reduce clutter):
What are virtual environments and why should I care?
It is very likely that you won’t actually need to use all of your machine learning packages for you web development project and your web development packages for your machine learning project. So one idea would be to create two new “boxes” or environments that you can access separately. Then your environments would look like this:
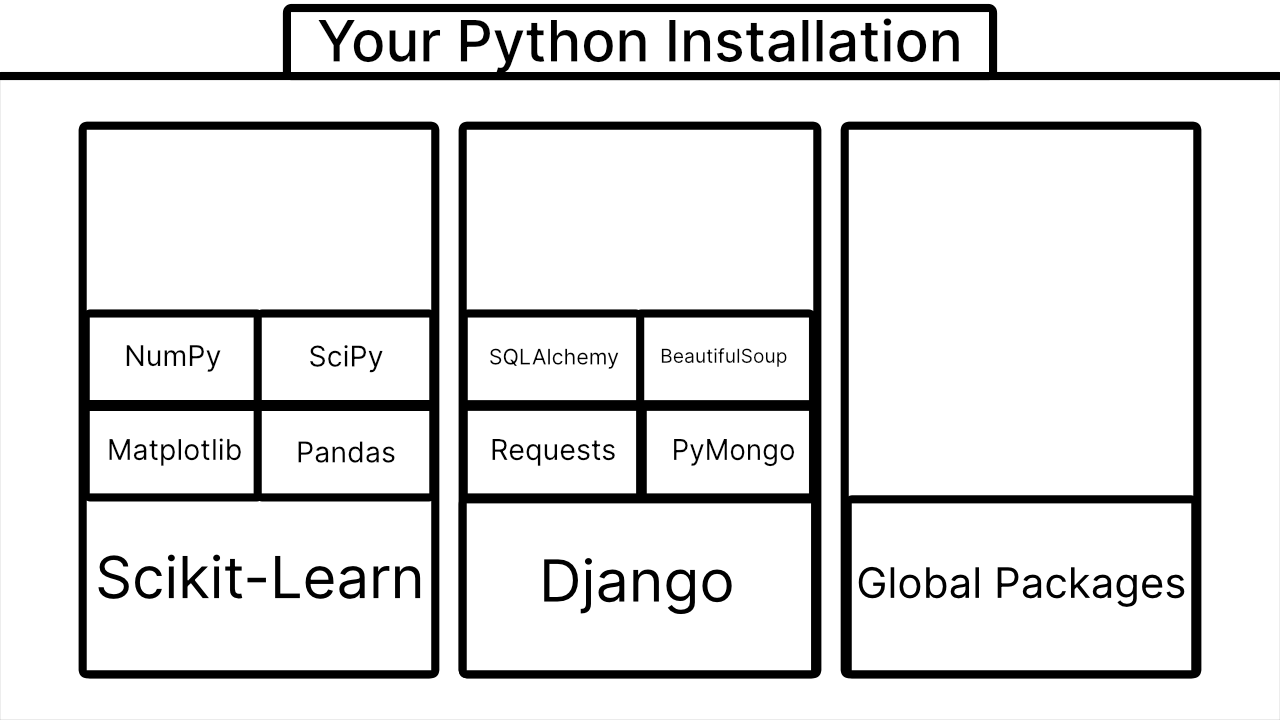
This looks a look neater! With virtual environments, you can choose which environment you want to use and you don’t have to always load every single package that is installed on your system.
Now I hear what you’re probably thinking, “Lari, I don’t do web development, I just want to do machine learning. Why should I use these environments?“. And that is a valid question! So let’s take a look at another useful application of virtual environments.
Imagine you are programming along with TensorFlow in August 2019, just minding your business, and then, in September 2019, TensorFlow 2.0 comes out. It has lots of cool new features, is much easier to use and everyone is talking about it. Now you have a choice to make. Do you continue developing using the now legacy TensorFlow 1.0 or do you migrate your entire codebase to 2.0, even though it is still fresh and untested? Well, why not do both? If you create one virtual environment where you have your old TensorFlow 1 installation, and a new one with TensorFlow 2, you can start testing out all of the cool new features without completely breaking your project. Your virtual environments may look like this:
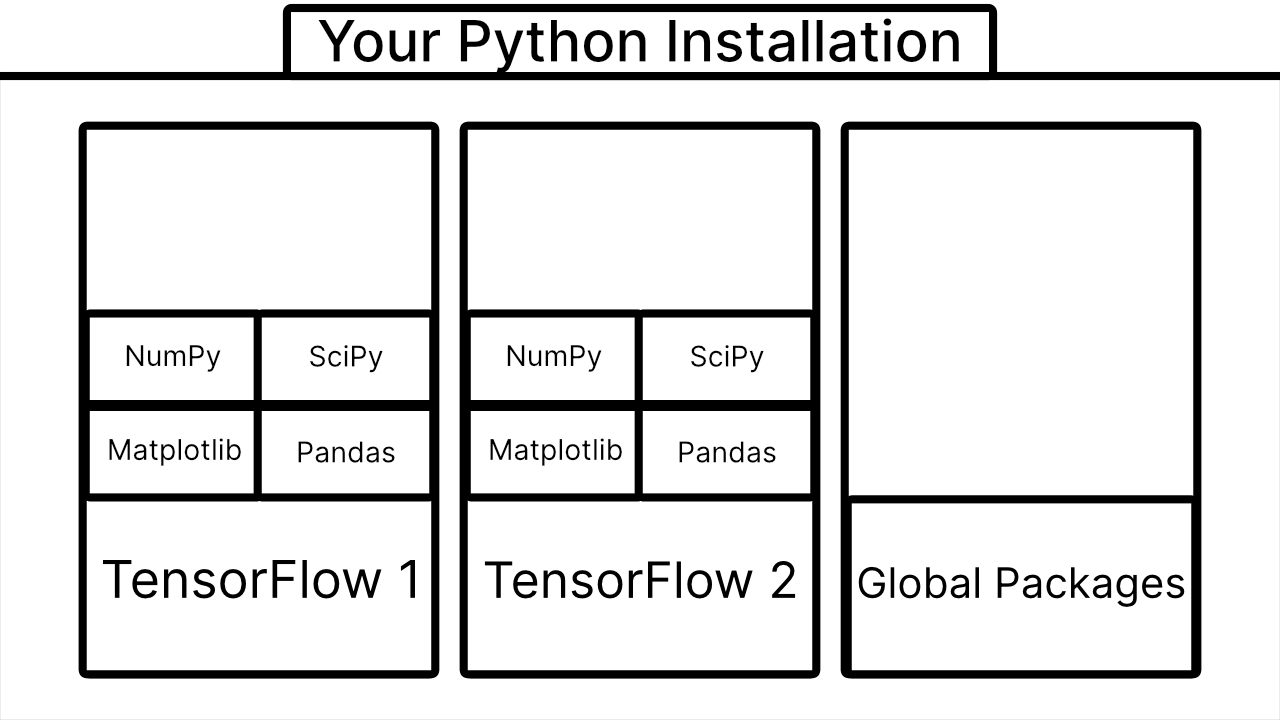
This preserves both of your applications and smoothens out the transition to the newer version. I think this is a pretty neat thing to do as it can save you a good amount of time and stress because you do not have to worry about your project breaking once you update a critical package or dependency. Now you might still say, “Lari, I always use the latest packages, I don’t work with legacy code and I only do machine learning. Should I still use virtual environments?“. And to that, I say: yes! Why? There are two more reasons why you should use virtual environments.
The first reason is that you are creating a good habit for yourself. If you are using virtual environments now, it will feel a lot more natural to you in the future and you will be more comfortable with environments once you will really need them. Ok, that is an a-okay-reason. But there is one more reason which was also the reason why I started using virtual environments.
Imagine you have just finished your awesome new project, and you are ready to share it with the world. You upload your code to GitHub, make a neat description and post about it on social media. To your surprise, people are actually pretty interested in your project. It does not take long until someone wants to run your project on their own computer. So they ask you: “Can you give me a list of dependencies I need to install to be able to run your program?“. Uh-Oh. If you did not use virtual environments and you have at least a single package that is not necessary to run your project, if you just give them your entire list of global packages, there will be way too much junk that they do not actually need. Now you could manually write down every package that you used. Or you could create a Docker-container (If you do not know what those are, do not worry, just read along) and run your program inside of it. But either way, it would be a lot cleaner if the person interested in your project or your Docker-container knew only those packages that are really necessary.
So, in order to make the user and your container happy, use virtual environments. Not just for your own good, but for the good of other people (and other containers). That way, you can just create a simple “requirements.txt” or “environment.yaml” (for conda) and everyone will know what they have to install.
If you are still not convinced to use virtual environments or you think that I missed some crucial argument for using virtual environments, please let me know in the comments below! I would love to hear your opinion on this!
Now that you are hopefully convinced that virtual environments are a good thing, let’s take a look at how you can use them. It’s not as difficult as you might expect, let’s take a look!
How can I use virtual environments?
There are many different utilities out there that allow you to integrate virtual environments into your workflow. Some of the names you might see on the web include “venv”, “virtualenv”, “pyenv”, “pipenv” or “conda”. So which one should you choose? Well, they all basically accomplish the same thing. Since Python version 3.5, the docs officially recommend venv for managing environments (See here). Another benefit of venv is that it comes preinstalled with since Python 3.3. This means that you can just start using venv and not worry about which utility you should use.
One small downside of venv is that you can not specify a different Python-version than the one you have on your system to create a new environment. So if you have Python 3.7 installed, but want to create a Python 2.7 environment, venv won’t be able to do this. If this is a feature you need, I would recommend using virtualenv or conda instead.
With that being said, let’s take a look at how to actually use venv.
Creating and deleting environments
To create a new environment you can just type
python -m venv myEnv # on Windows (or if you have Python 2.x installed)python3 -m venv myEnv # on Mac and Linux
This will create a new folder in your current directory titled myEnv, where all of the information for your environment will be stored. If you want to move your environment to a different location, you can just move this folder. If you want to remove an environment, you can delete the folder.
Activating and deactivating environments
To activate an environment you can type
.\myEnv\Scripts\activate # on WIndows./myEnv/bin/activate # on Mac and Linux
This will execute the activate-script inside of your environment-directory and start your virtual environment. After this command, you should see the name of your environment wrapped in brackets at the start of your prompt, like this:

To deactivate an environment, you can just run
deactivate
Inspecting your environment
You can view a list of all of your installed packages by running:
pip list
If you want each package-version to be output alongside the package names, you can run
pip freeze
instead.
Options for creating new environments
Initializing from a text file
You can also create a new environment based on a text file. If you find a file named “requirements.txt” in a GitHub-repo or something similar, you can create a new environment with all of the dependencies that are listed in that file by running
pip install -r requirements.txt
If you are interested in creating such a file yourself, you can do so by running
pip freeze > requirements.txt
This will run pip freeze and save the output in a file called “requirements.txt”, which is exactly what we want. Alternatively, you can create such a file yourself and just copy-paste the output of pip freeze into that file.
Initializing with global packages available
If you want to create a new environment, but still have access to all of your globally installed packages, you could either create a requirements.txt-file by following the previous step and then installing it with pip install -r, or you could use the following command instead:
python -m venv myEnv --system-site-packages # on Windows (or if you have Python 2.x installed)python3 -m venv myEnv --system-site-packages # on Mac and Linux
This will allow you to use any globally installed packages in your myEnv-environment.
If you install a package globally after running this command, it will also be available in
the myEnv environment. Also, if you uninstall a package globally, that is not installed
locally in your myEnv-environment, it will also no longer be available in your
myEnv-environment. If this is not something you want, you should create a requirements.txt-file instead, since this way there will be no “automatic updates”
So this --system-site-packages-flag updates
your environment automatically if there are changes in your globally installed packages.
Using the requirements.txt-method only updates your package list once when you initialize
a new environment.
When you install a package inside your myEnv-environment, it will not be available globally,
even with the —system-site-packages-flag. So this “synchronization only works one way.
If you initialized your environment with the --system-site-packages-flag and you want to
view all of the packages that are only installed locally in your environment, i.e. the packages
that were not added because of the flag, you can run
pip freeze --local# orpip list --local
Tips and best practices
Often you will see people saving their virtual environments directly inside their
project directories. This is good because not only will you not have to remember or search
for your environment location (it will always be there where the project is), but if
you delete your project you will also delete your environment, which usually is desired.
These directories are often named “env, “virtualenv” or “venv” (the latter one is fitting if you are using the venv-package). Calling your environment “venv” is a good practice, because the command you have to run to activate your environment now is the same across all of your environments
(.\venv\Scripts\activate) and you also automatically know which tool you used to create your environments.
One thing you have to pay attention to when you use this approach is that you should not commit your environment to source control (i.e. git). Your environments can get quite large in size and they are not really relevant to your project or to other people, so you should list your environment in your .gitignore-file. If your environment is called “venv” you can just add the following line to your .gitignore-file:
venv/
Instead, it is better to commit a requirements.txt-file (or environment.yaml-file) to your repository.
With this, you should now be ready to utilize venv to create and manage virtual environments!
Further Reading
If you are interested in Data Science and Machine Learning, you might have heard the term “Anaconda”. If you are not sure whether you should use Anaconda, I recommend you read The Only Post You need to Start Using Anaconda, where I show you everything you need to know and a bit more about Anaconda and whether it is right for you.
Share on:
