The Only Post you Need to Start Using Anaconda
In this article, you will learn what Anaconda and conda are, when to use them and how to use them. I will cover the pros and cons of Anaconda, installation on Windows, Mac, and Linux, as well as using conda to install packages and manage virtual environments and manage channels.
Share on:

Background image by Alfonso Castro (link)
Outline
In this post, we will cover what Anaconda and Conda are, when you should consider using them, and how you can do so. If you are not interested in the pros and cons of Anaconda and you just want to read about their usage, jump straight ahead to the section How to use Anaconda.
What even is Anaconda?
Anaconda is a Python distribution. You can imagine it being a sort of “flavor” of Python. The most important component of Anaconda is conda, Anaconda’s package manager. If you are unfamiliar with the term package manager, or with virtual environments in general, I highly recommend that you read the article Package Managers and Virtual Environments Explained, Step by Step first. In that article, I explain these concepts in great detail, going one step at a time. Even if you have used package managers before, you still might pick up a nugget of wisdom or two, so I really do recommend that you read that article.
If you know how virtual environments work, but would still like a quick refresher, here we go: A package manager (in the context of Python) is a piece of software that manages external packages on top of your local Python installation inside of a “box” called “(virtual) environment”. If you install external packages, they are added to your environment. By default, you always have full access to all of the packages that are inside your (global) environment. A package manager now creates new environments, thus allowing you to put certain packages only inside one specific environment. You could f.e. create an environment for Web Development and one for Machine Learning. You then need to activate an environment to use the packages inside of it. You won’t be able to use your Web Development packages inside your machine learning environment. Again, if you want to read about the benefits of using virtual environments versus putting all of your packages into one global environment, check out the article linked above.
Conda is exactly such a package manager. It is basically an alternative to pip, Python’s native package manager that comes preinstalled with most modern Python-versions
Anaconda - The Pros
One advantage conda has is that conda can manage virtual environments, while pip can’t. Now, this really is not that much of a dealbreaker, since the tool venv, which also manages virtual environments comes preinstalled with all modern Python-versions and is also the recommended way to manage your virtual environments
Another benefit of Anaconda is that you can use what’s called Anaconda Navigator, which is a GUI-program for launching popular applications for programming or data science-related tasks, such as VSCode, Jupyter, or RStudio. You can also manage your conda environments inside Anaconda Navigator (although I would really recommend using the command-line for things like that). If you are a bit shy of the command line and you really enjoy using GUI-applications, Anaconda Navigator might make your life just a tiny bit easier.
The third benefit of Anaconda is that, by default, conda comes with a lot of machine learning packages preinstalled. Conda comes with NumPy, Matplotlib, Pandas, Scikit-Learn, and many more out of the box. This means that you do not have to install these packages manually; instead, you can just install Anaconda and be ready to start working on your next data science or machine learning project. If you do not want to have all of those additional utilities and packages, you can just install Miniconda, which is a minimalistic version of Anaconda, that comes without Anaconda Navigator and does not preinstall that many packages onto your system.
The fourth and final benefit of conda is that it is the recommended way to install and use Spyder
As we see, the main arguments for using conda are that conda can make your life easier under certain circumstances. The only strong reason to use conda is if you are also using Spyder as your IDE. With the pros covered, let’s take a look at the cons of using Anaconda.
Anaconda - The Cons
As we saw, the pros are mostly “quality of life”-aspects. This also means that if you are comfortable with your current setup, using f.e. pip and venv and you also like managing your environments and launching your programs like Jupyter from the command-line and you also either don’t care about Spyder or you use it in combination with pip, then there really is no reason for you to make the switch to Anaconda. In fact, not putting another piece of software on top of your existing stack might even be helpful, because of a few reasons.
Firstly, since pip is the default package manager for Python and more people in general use tools such as venv or virtualenv over conda, you will be more likely to find solutions to errors you encounter on StackOverflow, since a broader range of people use pip over conda.
If you also think about making the switch to Anaconda, but you don’t like all of these additional dependencies and think about going with Miniconda, why not just stick with pip? Pip and conda only have that many differences and switching from one to another won’t make that big of a change. Also, if you are already using a tool such as venv to manage your environments, it will be easier for you to just stick with your current configuration rather than moving all of your existing environments to a new manager, such as conda.
One final aspect, which is often overlooked, is that pip is a lot more battle-tested and robust. This means that you might encounter errors with conda that you would have never encountered with pip. Now, most of the time conda will work just fine, but you might just end up in a situation with a really annoying problem and no pleasant solution. So in terms of reliability, I think pip is the winner here.
What do I use?
If you are curious to know which tools I use, I can tell you that I have tried both conda and pip in combination with multiple virtual environment managers, and I ended up sticking with pip+venv as my preferred configuration. However, I have also seen Anaconda being actively used at a research institute for which I work, so both options are certainly good choices.
Do you already have a favorite tool for managing virtual environments? I would love to hear your thoughts on this! Feel free to post a comment below and let me know what you use for your Python setup.
With all of that being said, I think Anaconda definitely has some valid use-cases and certainly has good reasons to exist. If you have decided that you want to give Anaconda a try, read on, because now I will show you everything you need to know in order for you to be able to start using Anaconda and conda right away in your next project.
How to use Anaconda
Installation
Windows / OS X
If you are using either Windows or Mac OS you can just download the graphical installer over at the Anaconda website. For this, just go to https://www.anaconda.com/products/individual
and scroll down until you find this section:

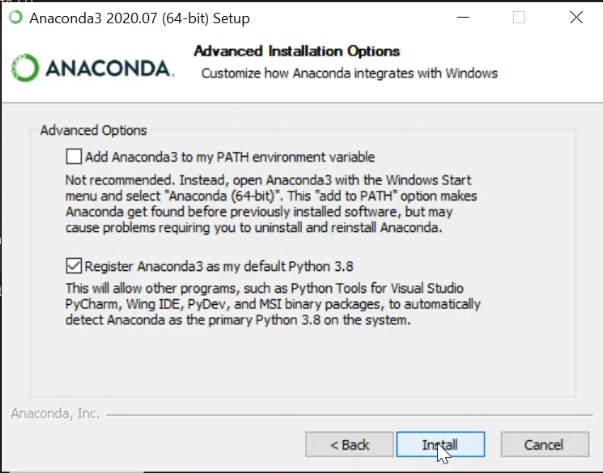
Once you have downloaded the installers, open the downloaded file and then just click yourself through the installation process. Usually, you can just accept the default values. If you are thinking about which options to choose in this menu here,

then you should consider a few factors. Are you already using a Python installation on your machine and do you want to keep primarily using your already installed version of Python? Then don’t check the second box. If you want to primarily use the Python installation managed by conda, then tick the second box. Usually, you do not want to check the first box, since you can launch Anaconda-applications with separate programs, such as Anaconda Prompt or Anaconda Navigator, so there is no need for you to add it to the PATH in most cases.
After the installation has finished, you should be good to go.
Linux
If you are using Linux, the installation process may differ slightly based on your distribution.
First of all, download the installation script here:

Now, before you run anything, make sure to install the dependencies first. To find out which packages you have to install, you can go to this page right here. If you are using a distribution based on Ubuntu (Ubuntu, Linux Mint, Lubuntu, Kubuntu, …), you can follow the installation instructions for Debian. This page also contains information on the installation procedure as a whole and generally speaking, you should follow the instructions on that page, since they may change over time. At the time of writing this article, here is how you would install Anaconda on an Ubuntu-based system.
Open a terminal
sudo apt-get install libgl1-mesa-glx libegl1-mesa libxrandr2 libxrandr2 libxss1 libxcursor1 libxcomposite1 libasound2 libxi6 libxtst6
This will use the package manager apt to install all of the dependencies listed above, that are needed in order for Anaconda to work properly. You can also verify the integrity of your downloaded file, but I will not go over it in this tutorial, since this will usually not be necessary. You can check the details in the documentation linked above.
Then, open your file manager and navigate to your Downloads-folder. There you should find a file named something similar to this: “Anaconda3-2020.11-Linux-x86_64.sh”. Now you need to go back to your terminal or open another one if you closed the previous one. In your terminal, paste the command from the documentation. It should look similar to this one:
bash ~/Downloads/Anaconda3-2020.02-Linux-x86_64.sh
What this will do is it will use bash, your Linux-Shell to execute the file you just downloaded. This is similar to executing a “.exe”-file on Windows. Now, you could instead just right-click on the same file, grant it permission to be executed, and then double-click the file. However, I would not recommend this approach, because, with this approach, the file will usually open a terminal which will be closed after the file finished executing. This means that if the file has some error, you will not be able to see it in the terminal, because it will close immediately. This is why I recommend running the file through your terminal directly.
Once you executed that command, your terminal should look similar to this:

Now you need to press down and then hold down the Enter-Key to scroll through the license agreement. After a while, you should be prompted to answer “yes” or “no”. Type in “yes” to proceed and confirm with Enter. Then you should see this:

Unless you have a reason to install Anaconda into a different directory, it is recommended to just stick with the provided directory and continue. Then you should be asked whether or not you want the installer to prepend the Anaconda3 install location to your PATH-variable. In most cases, you want to confirm this by typing in “yes” and proceeding with Enter. If you have accidentally typed in “no” or skipped this question, here is what you can do. There should be a message telling you that you should consider adding a path export to your .bashrc-file. Just open that .bashrc-file (it should be in your home-directory ”~”) and paste the export that the installer printed before. The line should look similar to “export PATH=…:$PATH”
After that, Anaconda may ask you if you also want Visual Studio Code to be installed. Type in “yes” or “no” perform the corresponding action. If you decline, you can still install VSCode afterward.
Now the installation procedure should be complete and the last line of your terminal should look like this:

The “(base)” at the start signals that, right now, the base environment of Anaconda is being used. This is your global environment. Now that we have installed Anaconda, let’s go over the commands you need to know to use it!
Usage - Command Line
Firstly, I will cover how to use Anaconda with the command line. If you only want to use the GUI-tool Anaconda Navigator, skip to the section Usage - Anaconda Navigator
Adding and Removing Packages
Once Anaconda is installed, you can activate/deactivate your environment on Windows by running
activate environment_namedeactivate
or
conda activate environment_nameconda deactivate
if you are on Mac or Linux. You can add packages with
conda install package_name
and you can remove packages with
conda remove package_nameconda uninstall package_name
These two commands both do the same thing. You can also use pip if you want to. So let’s say we are in this base environment and we want to install NumPy. We could use one of these two commands:
pip install numpyconda install numpy
Managing Virtual Environments
Virtual environments separate the packages you have installed on your machine. Say for example you want to have one Python installation for Tensorflow and one for PyTorch. You could create two virtual environments and then install packages directly into these environments so that they won’t be visible outside of them. If you want to create a new virtual environment in Anaconda, you can just type
conda create --name environment_name list_of_packages
to create a new environment with the name environment_name.
So if we wanted to create a new environment named “myEnv” that contains the packages NumPy, Matplotlib and Pandas, we would write the following command:
conda create --name myEnv numpy matplotlib pandas
This command can be shortened to
conda create -n myEnv numpy matplotlib pandas
where -n is a shorthand for --name.
Note that you don’t have to specify packages to be installed in your new environment. You could also
just type in
conda create -n myEnv
to create an empty environment. You can also specify a specific Python version to be used inside of your environment like this:
conda create -n myEnv python=3.6
You can do the same thing for specific packages like so:
conda create -n mEnv numpy=1.18.5
If you want to install a package into a specific environment, you have two options. You can either activate the environment and then install the package or you can install the package directly into the environment by specifying the name of your desired environment. For the first variant, type in
conda deactivateconda activate myEnvconda install numpy
and for the second variant, type
conda install -n myEnv numpy
To remove an environment type
conda remove -n myEnv --all
You can check whether the removal was successful by running
conda info --envs
You should not see the environment myEnv listed anymore.
Options for creating new environments
You can also create a new environment based on a text file. If you find a file named “environment.yml” in f.e. a GitHub-repo, you can create a new environment with all of the dependencies that are listed in that file by running
conda env create -f environment.yml
If you are interested in creating such an environment.yml file yourself, without having to type out every single package by hand, run
conda env export > environment.yml
You can also specify the directory where your environment should be located at. Say f.e. you have a project called “myProject”, that has the following folder structure:
- myProject
- src
- pages
- content
- img
- config.txt
- (environment.yml)
- src
and you want to save your environment(s) in a separate folder called “environments”.
You can do this by first navigating to your project inside your terminal or
Anaconda Prompt using the cd-command and then running
conda create --prefix ./environments numpy pandas matplotlib
Of course you can also create an environment from a text specification:
conda create --prefix ./environments -f environment.yml
This is good when you want your project to also contain all of your development dependencies. Then you can activate your environment with
conda activate ./environments
Using this method, you will no longer be able to give names to the environments. This means that you will have to provide the full path to the environment in order to activate it. For more info, check out the docs.
Please note that if you create an environment with this path-specification rather than a name-specification, then your installation directory will be written to the
resulting environment.yml-file when you run conda env export. If this is an issue, you can either delete it by hand or
use the Unix-utility grep if you are not on Linux or Mac (reference):
conda env export | grep -v "^prefix: " > environment.yml
Updating your environment
If you want to update a package in your project, you can run one of these commands, depending on whether you are currently in your desired environment or not.
conda update numpyconda update -n myEnv numpy
If you are using an environment.yml file, just update the version listed in the file, if you did provide one in the first place, and then run
conda env update --prefix ./environments --file environment.yml --prune
The --prune-option makes it so that packages no longer needed will be uninstalled.
Conda Channels
Channels are the place where conda looks for when you want to install a package. Usually, you do not have to modify the channels you are using, since the default channels already contain most of the common packages. Sometimes though, the documentation of the package you want to install will specify a specific environment for you. So how can you install a package from a new channel? For a one-time installation, you can use the -c argument. By far the most popular channel is conda-forge, which is community-maintained and contains a lot of packages. So if you wanted to install NumPy using conda-forge, instead of the main conda channel, you could simply type
conda install -c conda-forge numpy
If you want to permanently add a channel to your local list of channels, you can type
conda config --prepend channels new_channel
to make this channel the new top-priority channel, meaning conda will look in this channel before every other channel to find packages. You can also add it as the new bottom-priority channel, meaning conda will look at this channel last, by typing
conda config --append channels new_channel
You can find more information here.
Useful Commands
To display a list of every installed package+version in the currently active environment, or in a specific environment, run
conda list# orconda list -n myenv
To display all available commands, type
conda --help
To display all currently available environments, type in either of the following two commands:
# displays all currently available environmentsconda env listconda info --envs #same as above
Usage - Anaconda Navigator
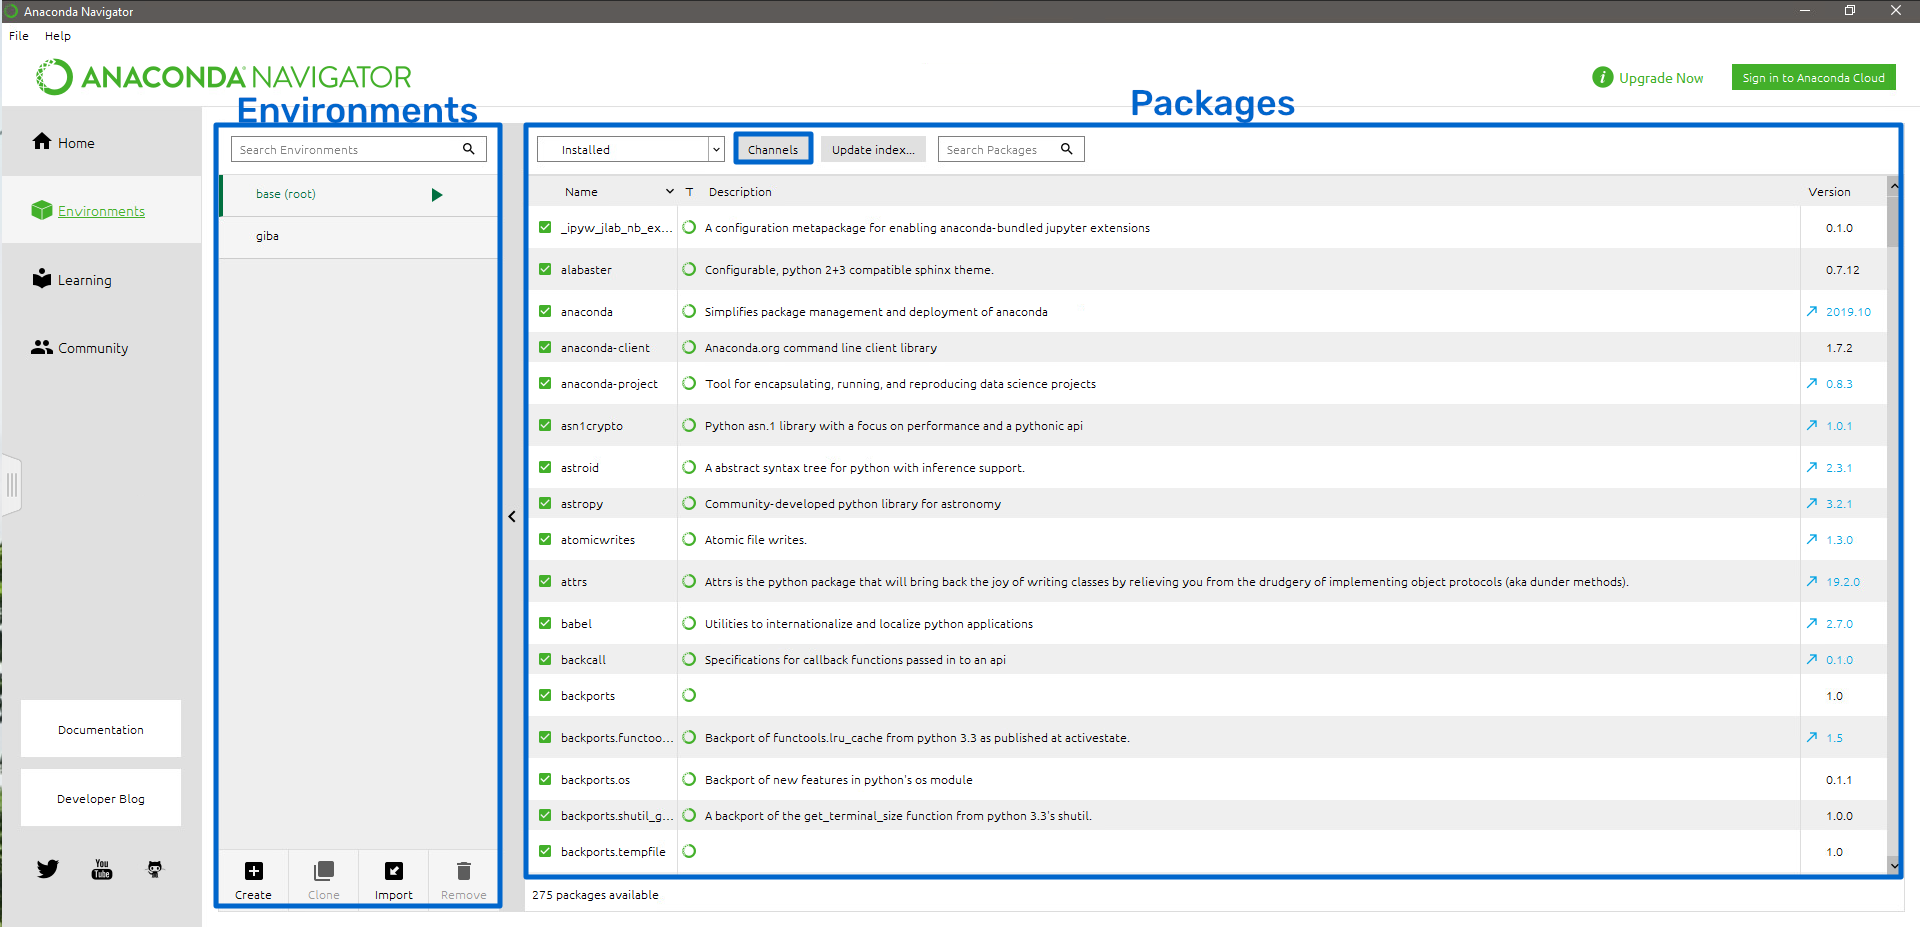
If you prefer a GUI, you can also do most of the actions that are possible in the CLI-tool inside of Anaconda Navigator as well. Once you open the app, go to the “Environments”-section on the left-hand side and you will find familiar elements. Specifically, you can separate the interface into two main parts:

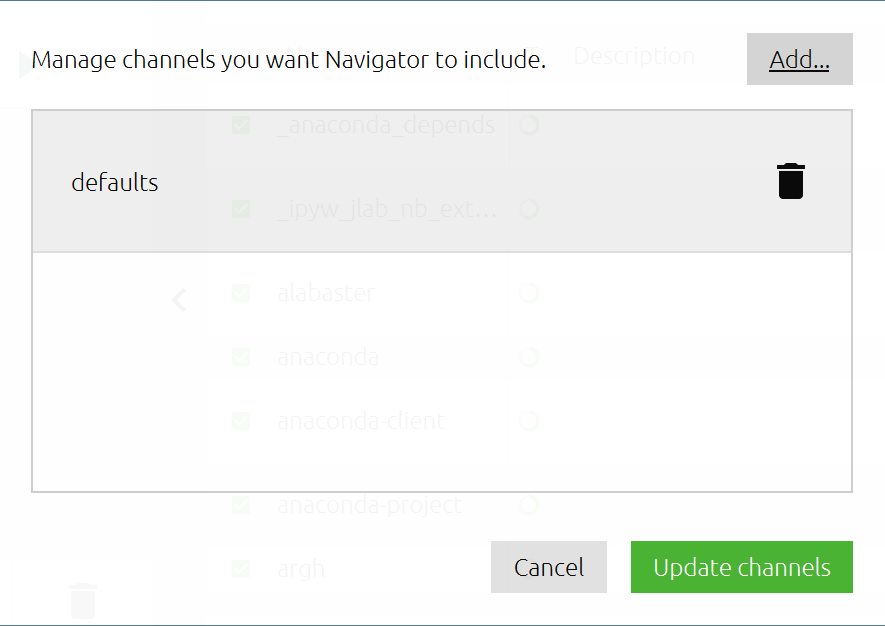
On the left, you can manage your environments, whereas on the right you can manage your packages and also your channels, which are hidden away in a separate menu, that you can open by pressing the button on the top. The now visible window should look similar to this:

Using this interface should be self-explanatory in most use-cases, so I won’t go into more detail here. Please note that Anaconda Navigator was optimized for larger screen sizes, so if you are using the program on a laptop, your interface might look a bit cramped.
Even if you prefer using a GUI, I would still recommend at least trying out the CLI-utility, since it functions in a very similar fashion to pip/venv, whereas Anaconda Navigator is a tool exclusive to Anaconda. Nevertheless, it does not hurt to know that both options exist.
Useful websites
There is a conda cheat sheet, which you can find here.
Anaconda also has a “getting-started”-website with a lot of useful information. You can find it here.
You can also find the documentations here:
Further Reading
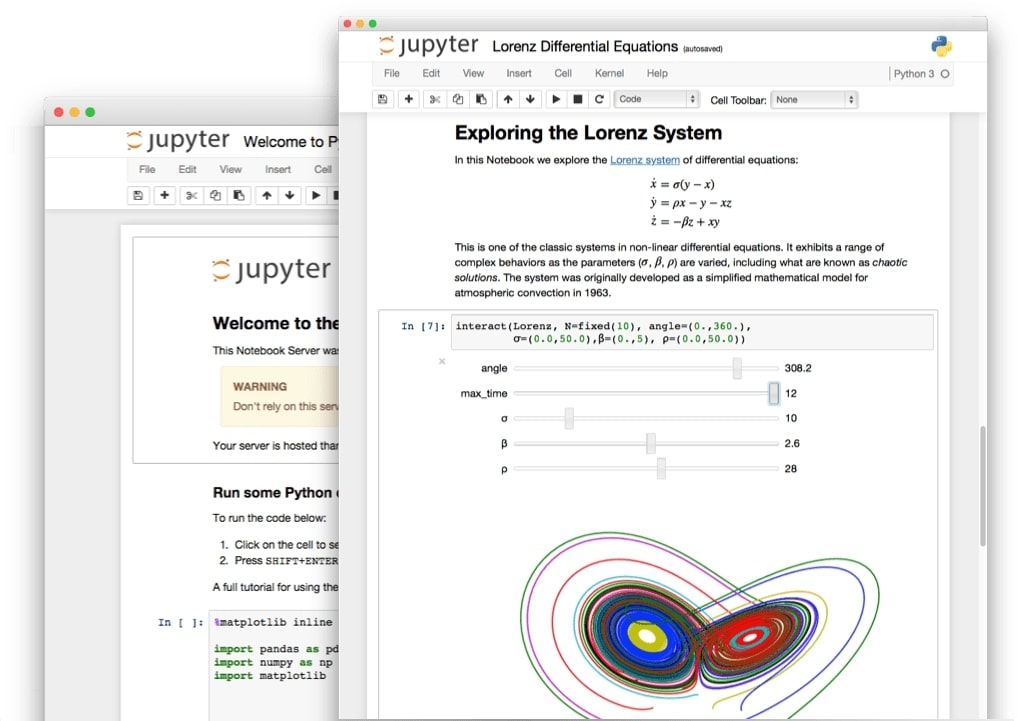
If you just got started with Data Science and Anaconda, you might also be interested in Jupyter, a collection of programs that allows you to interactively run code in your browser, display figures directly inline, and also format your document with markdown-text. It looks like this:

If you are interested in reading more about Jupyter, I highly recommend that you take a look at The Only Post you Need to Start Using Jupyter, where I tell you everything you need to know and a bit more about Jupyter and the awesome things you can do with it.
Share on:
